The mini-quilt

Untitled
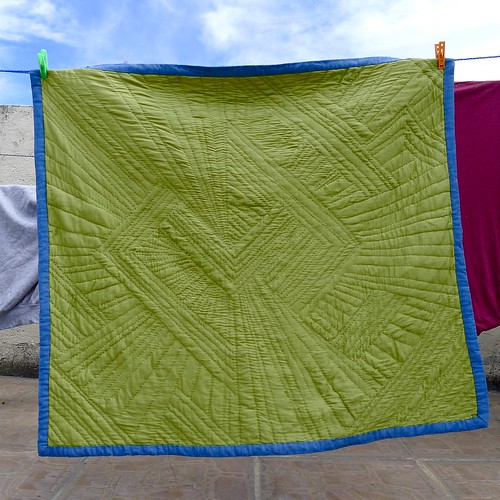
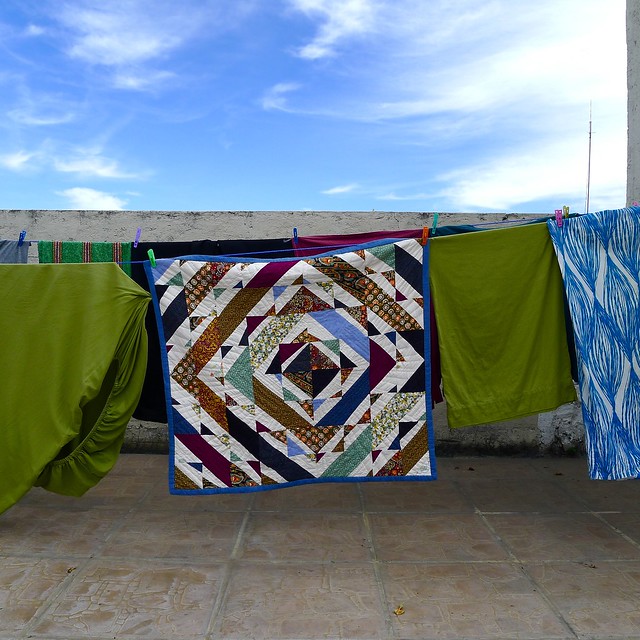
The little quilt is done! And I love it. The rainy season in Mexico is about over and we can start using the clothesline with more confidence, so here it is drying amongst the bedsheets on our rooftop.

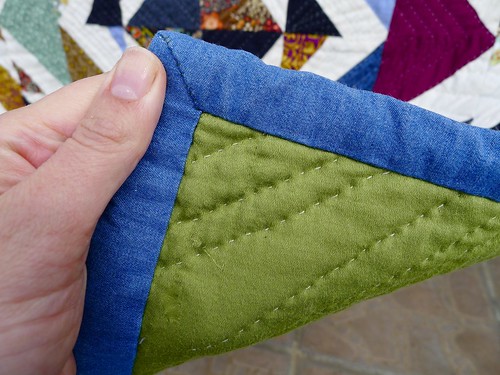
Pattern: Double-trouble block, machine-pieced and hand-quilted
Fabric: cotton scraps and a bedsheet for the back
Batting: Heirloom Cotton
Size: 32.5″ by 35.5″
Recipient: the back of our ugly rental couch

The project started purely as a way to de-stash – there’s a few dresses in there, a previous quilt, and some of my grandma’s fabric. I was making good progress last spring, but then things stalled out and this became a mini-quilt. Made for easier suitcase-packing anyway. It took a few weeks, but I finally figured out how I wanted to arrange the quilting stitches.

PicMonkey CollageWhile home in Ohio last week the goal was to finish the hand-quilting so that I could use my mom’s machine to attach the edging. I finished quilting around 7pm the night before my early morning flight. Oops. Never one to shy away from a project, my wonderful mother helped me pin, stitch, and press well into the evening. When the sewing machine wouldn’t behave she coaxed a back-up machine to life (it’s one of those inside-the-wooden-table White machines) and off we went.

UntitledI again pulled up this tutorial as a reminder on how to finish the edging. Highly recommended. I finished the hand-sewing part of the edge during two airport layovers the next day. And then voila! Now I’ll shift efforts to the knit blanket.

Untitled

Untitled

Bold striped sundress

Midwest

It’s been a while since I posted (complained my mother last time we talked on the phone 😉 I have a few things on my project list to show you guys, but I’ll start with a nice sundress to go with all this hot weather we’ve been having.

We recently went to Ohio for my little brother’s wedding and I got in my head to sew something for the rehearsal dinner – the dress for the wedding being set since I was a bridesmaid. I finally got around to using the bold striped fabric that I got in L.A. last spring, as well as a vintage pattern that I picked up last summer at my Gramma’s house (Simplicity 3426: undated, but looks like the early 60s). I felt really nervous cutting through those pretty stripes!

dressstripe

The bodice took forever because I wanted to make sure 1) the stripes matched up from front to back and 2) it was nice and fitted since this fabric has a little stretch to it. I always start a little bigger than I think I’ll need and then gradually take in bigger and bigger darts and/or seam allowances until it’s right.

I thought that after all of the fiddling with the bodice the skirt would be a breeze, but by the end of the night R. was getting annoyed with all of my fussing, seam-ripping, and repeat trips from the bathroom full length mirror to the sewing machine. I think his exact descriptors for my sewing process were “obsessive” and “consumed”. Humph. I’d say the same about his process for studying for comps  – which he passed, by the way – so although it’s hard for the other person, obsessive gets the job done.

Untitled

All of the cardigans I tried on with the dress looked frumpy so I picked out a chambray shirt at TJMaxx the night before we left and tied the front up. I have two pictures of the dress in action. First the rehearsal dinner where I got to hold one of my cousin’s new twins, also Katie 🙂 Baby Katie is adorable, and she tried to top my bright stripes with pink polka dots and a tutu.

My new baby cousin

My aunt came up to me at the dinner and asked about my dress. When I told her I got the pattern from Gramma she made me take off the chambray shirt so she could see the bodice, and then exclaimed, “This is MY pattern! The first and only dress I ever sewed in 4-H!” So that was pretty cool.

Later I got cajoled into singing karaoke at the hometown bar. I’ve never sung karaoke before. With more advanced warning I might have had a few drinks before going up there. I don’t think I fooled anyone about not wanting to sing all the words to Baby Got Back (and there are a million of them) haha. Even in this picture I look eager for the song to end. Karaoke

The wedding the next day was beautiful 🙂 My mom did all of the flowers, which were gorgeous, and all of the logistics went smoothly and we got a lot of quality time with my family. Welcome to the family Amy!

Wedding flowers
wedding

Southwestern Shell: simple summer sewing

This is the post script to the sewing binge I went on a couple weeks ago – a sleeveless shell made from the aqua southwestern print from L.A.

Untitled

Untitled

I traced the pattern from a turquoise Banana Republic shirt…it’s one flat back piece, and one front piece with bust darts.

I was stumped as to how to finish the edges, especially the neckline. I love the loose tie on the turquoise shell, but my machine was having trouble finishing the raw edges of this fabric…all my attempts looked shoddy. Then I remembered that a coworker had recently handed me a package of black bias tape in the office kitchen: I meant to buy iron-on hem tape, but instead I got whatever this is. Someone said you sewed so can you use it? 

Yes! It was just what I needed to tidy up the armholes and neckline…

Untitled

While I had the machine out I started going through my scrap pile and playing around with the beginnings of a quilt. I haven’t pieced a quilt in a while, but so far I like where this one’s going…

Untitled

Remake of a vintage dress

After deconstructing my white vintage dress to make a pattern from it, I planned to put it back together before starting anything else.  But I’ve been feeling sad – my best buddy at work took another job – and cutting into this funky green/blue fabric offered some consolation. I sat at my new little sewing nook late into the evening, pinning and seaming. And here it is!

Untitled

Untitled

While deconstructing the dress, I made a mental note of how certain details (i.e. neckline) were put together and I made sure to mark the placement of darts and the zipper. Since the pieces were traced from a dress that fit well, I didn’t have to pause while sewing to try things on and make pattern adjustments, AND I knew I’d like the final fit. So even though ripping every seam out of a piece of clothing seems scary, I’m a believer!

Untitled

Untitled

Untitled

A New Sewing Nook

After bringing all that fabric back from Los Angeles I’ve been hell bent on creating a sewing station. Wall space is at a premium here, but there’s a connecting door between our bedroom and the spare bedroom and I figured that by permanently shutting it I could carve out a few feet. To the left of that, where Read has his keyboard set up, I wanted to make a cutting table out of two used kitchen base cabinets and a big board covered in cork… like this.

I drove the streets of Boston for miles yesterday, stopping at Habitat for Humanity’s Restore in West Roxbury, a ginormous Goodwill, and the Reuse Center at Boston Building Resources. Turns out everyone sells used cabinets as a set…you have to want a whole kitchen’s worth.  So sad. The only things I found were random bits of architectural beauty that have no place in our apartment, like this intricate metal gas fireplace for $200:

IMG_5829

The trip was a total bust. At home, mopey and disheartened, I searched furniture on craigslist. And there it was.  Two blocks from our house. A kitchen island, solid wood, for $30. YEs! I could feel my project adrenaline returning!

The island had these castor wheels on the bottom so my big plan was to wheel it all the way home. Only the wheels weren’t attached, so every time it hit uneven ground one or more fell out of their sockets. I was putting wheels back in every few feet. The woman who sold it to me looked very confused when I declined her offer to have her husband drop it off on Monday when he got back from his work trip. “He has a truck,” she said. I thanked her politely, but inside I was like, MONDAY?! MONDAY?!!! HAHAHAHA ARE YOU CRAZY? I HAVE TO BUILD THIS THING TONIGHT LADY! I have zero patience when it comes to projects.

Read helped me carry it home. He even stopped watching March Madness to help me carry it home. I know, he’s too nice sometimes.

Here’s what I made with it…

Sewing Nook

I extended the table workspace with a 1/2″ board from Home Depot, and I painted the bottom shelf and the top board a deep navy. Three rattan baskets from Target hold all my fabric underneath and notions fit in the drawer. I put a little cloth on top and hung an IKEA paper light overhead. It needs some artwork on either side of the door, and I may hang a long curtain in front to hide the mess.

Project Budget
$30 – kitchen island
$13 – 2’x4′ board
$39 – three rattan baskets, 17″x10″
$0.50 – a pint of navy paint from the “mess-up” shelf at Home Depot

If I can find a curtain for less than $16, then the whole thing will still come in at less than $100. As for the cutting station, I might just get a big roll-up Xacto mat to lay out on the kitchen table.

I leave you with a portrait of a gentleman:

Week of Projects from L.A. Fashion District – Tue

Today’s installment of sewing projects inspired by my trip to L.A.’s Fashion District: some kind of simple breezy shell made from this southwestern print.

The southwestern prints were huge last spring, and while I still see them in stores, they may be on their way out (??). But if I stick to a classic tunic/tee shape the shirt could have some staying power. Untucked with black pencil pants, or tucked into a stretch black pencil skirt…flats or sandals…could be perfect for summer.

More inspiration….

Week of Projects from L.A. Fashion District – Mon

Yesterday I posted about my afternoon in L.A.’s Fashion District and the 8 pounds of fabric I smushed into my carry-on suitcase. Putting all the projects into one post would be too much, so I’m making a week of it.

Today – this nice big piece of striped cotton. It’s nice and crisp, perfect for a spring dress like this vintage pattern from 1947. I’m picturing horizontal striping for the gathered skirt, with green at the bottom. Then the bodice will be the light aqua, maybe horizontal or maybe tilted on the diagonal.

As inspiration…

Spoils from L.A.’s Fashion District

The Fashion District in Los Angeles (formerly called the Garment District) is 100 city blocks chock full of flowers, handbags, shoes, apparel, wholesalers, and best of all – fabric.

I walked the Fashion District one afternoon while Read attended his conference. It was like a reality-television shopping challenge: a bazillion stores, four hours, one credit card, no bathrooms, and whatever I bought I had to be able to carry on foot to the Staples Center about a mile away.

Some posts I’d read that morning over coffee (like this one from Sew Country Chick) recommended starting at Michael Levine, which is an actual store and not a stall. Credit cards are accepted, but not haggling.

All the apparel fabric at Joann’s and Michael’s has been pushed out by printed fleece and cheap craft project stuff, which makes shopping there for clothes-sewing very depressing. In comparison, Michael Levine is like Christmas. It’s  just magical. Wool, silk, suiting, eyelet, jersey knit, buttons, chintz, satin….bolts and bolts of it.

Across the street is Michael Levine Loft, where all fabric is $2.50 per pound. The bins (i.e. huge cardboard boxes on pallets) have obviously been pawed through by many a bargain shopper and it’s hard to excavate past the top few layers. I’m sad to admit that my arms got tired.

P1010767

Just as I’d resolved to leave, someone called out “New fabric ladies!” and wheeled a huge bin in from the back room. It was full of beautiful prints, all perfectly folded. A fellow shopper and I went to town. She commented on every piece of fabric passing through her hands, which isn’t really that weird. It was external processing stuff like, “I could make a flowy dress thing out of this!” Pretty soon though I realized she not only wanted to comment, she wanted me to respond. If I didn’t, she’d persist: “Don’t you think? Huh? Can’t you picture a flowy dress?” So I spent the next 45 minutes stacking my favorite fabrics in a little pile and emitting a steady stream of “Yeah” and “Definitely” and “For sure”.

I left with just under 8 lbs. of fabric, the projects for which should keep me busy all spring and summer. This week I thought I’d post one project plan per day. First up is this lightweight jersey knit in gray, black, and yellow:

Jersey Knit

The print is somewhere between feathers and a geological cross-cut. It’s really pretty. My plan is to make a long maxi skirt with a fold-over waist:

The pattern will be simple to improvise, but I haven’t sewn much with jersey…do you have any tips? This is when it would be great to have a serger, but hopefully I can make do.

Modern updates for a vintage 1940s dress pattern

Butterick 4838 - 1940s

The camera arrived! I haven’t figured out all the bells and whistles, but managed to shoot some photos of the dress I finished on Monday. I started with Butterick 4838 from the 1940s and made some modern edits: shorter hem, lower neckline, and no collar. Plus, because I dislike sewing buttonholes, a back zipper instead of front buttons.

Butterick 4838 from the 1940s

Like a lot of midwesterners I belonged to a 4-H club as a tween. My first 4-H project was called “Joyful Jumper”. It was the early 90’s okay? I promise jumpers were sorta cool. Anyway, I don’t recall it being an entirely joy-filled experience (temperamental sewing machine, stuffy upstairs bedroom, confusing pattern directions) but the one good thing I took away from it was learning how to sew a blind hem. That jumper had crooked seams and wonky armholes, but the hem was beauuuutiful.

I busted out my old 4-H skills and blind hemmed this dress while watching a movie.

Handsewn blind hem

If my hemming is reliable, my zipper installation is not. Sometimes they’re great and sometimes they’re awful. Pardon my boasting, but this was one of my Top 3 Zipper Installations EVer. Here’s my new and improved set of steps:

1. Using the largest machine stitch size, sew garment together as if there’s no zipper. Press seam open.

2. With a seam ripper to (carefully!) open the seam where the zipper will go.

3. Place the zipper behind the seam. Don’t spread the seam open- keep it lying flat. Using a contrasting color of thread, hand-baste both sides in place (this worked better than pinning it, so it’s worth the extra time).

4. Using a zipper foot on your machine, stitch the zipper in place.

Butterick 4838 from the 1940s

My new shoes came too! They’re keepers.